
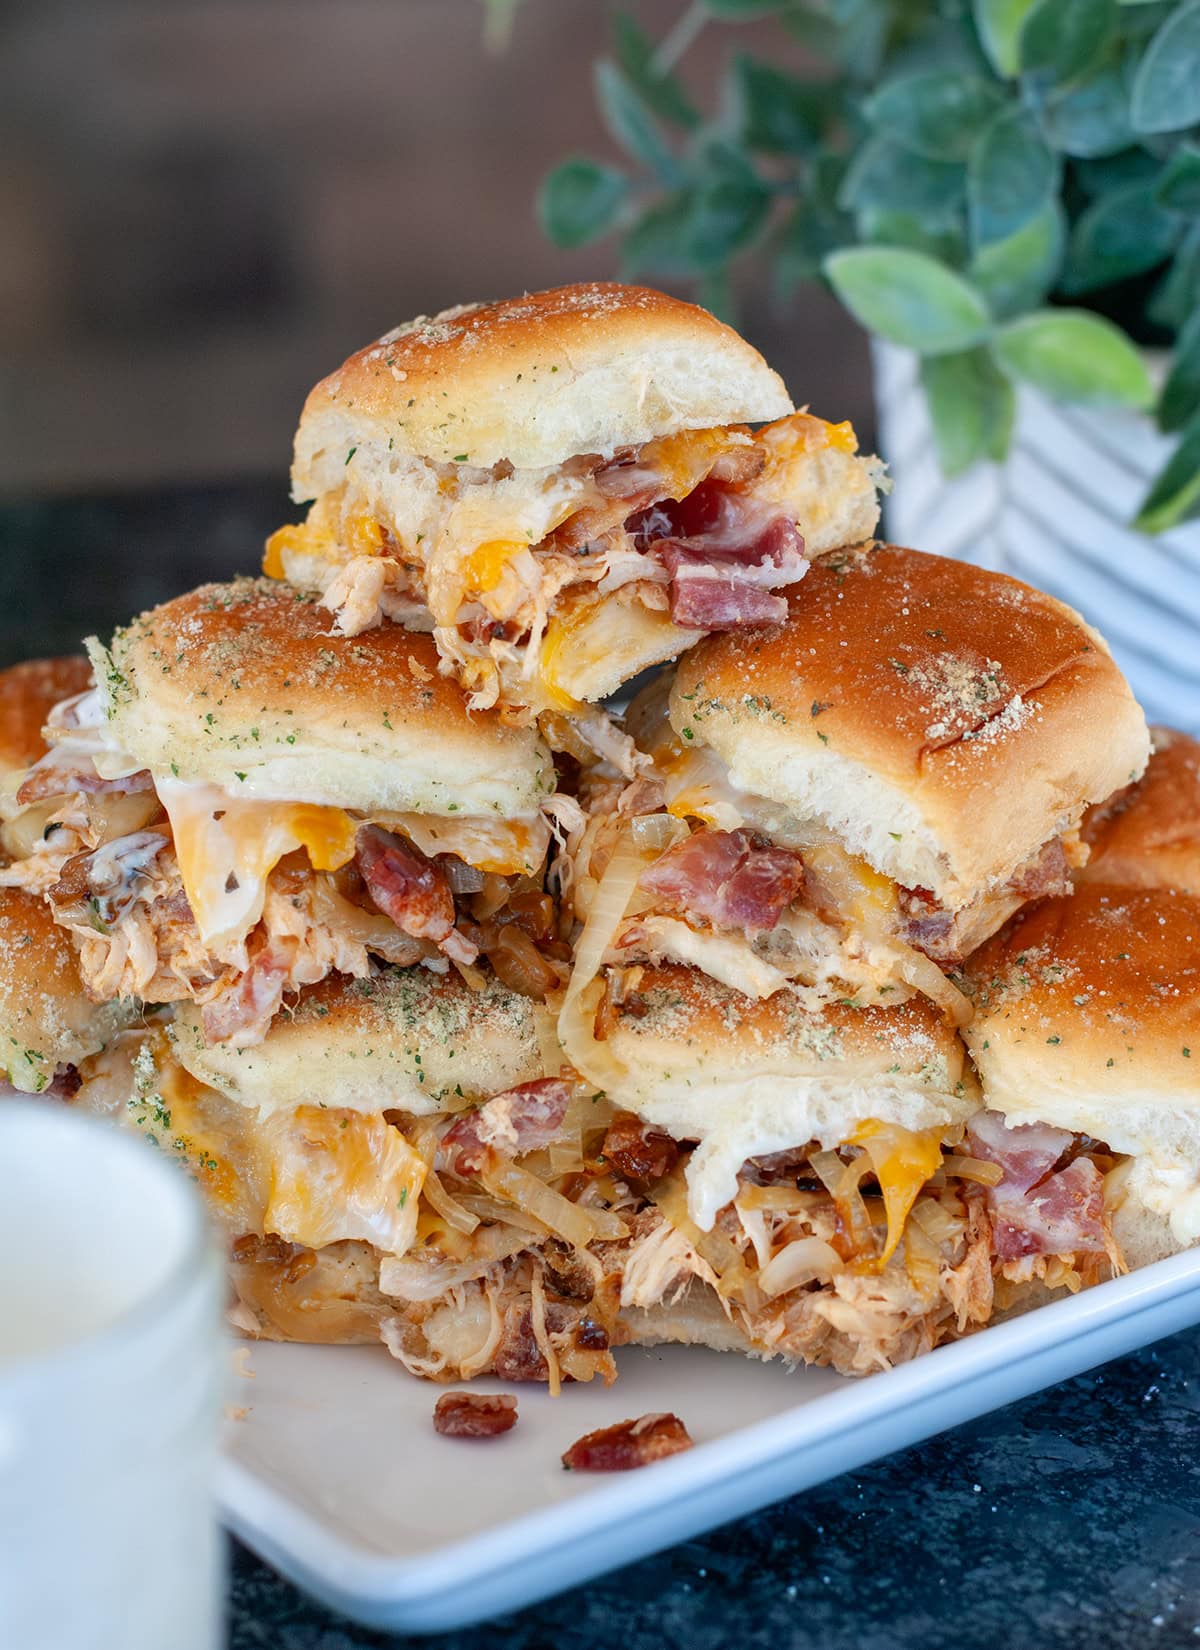
These Chicken Bacon Ranch Sliders are packed with huge flavor with fewer than 10 ingredients, and are the perfect appetizer. These are a favorite to feed a crowd and are perfect for parties, game day, or a simple weeknight dinner.
Jump to:
This recipe was born out of my real-life cooking. I am always on the hunt for the perfect little sandwiches to serve my family. These Chicken Bacon Ranch Sliders are easy to eat, bring zero complaints, and are always devoured.
I love making sliders, and I am always thinking of new slider recipes to make. My Roast Beef Sliders and Corned Beef Sliders are two of my favorites, and this one fits right in with them.
Reader Review: "I made this chicken slider recipe and served them at my daughters birthday party. They were so good and a big hit, not to mention easy to make." - Melissa
Why You'll Love This Recipe
- Great for parties - These chicken sliders with Hawaiian rolls are a huge hit anywhere I take them.
- Easy to customize - You can use this basic recipe and use your favorite flavors.
- Quick to make in large batches - You can double the recipe and bake on a sheet pan lined with foil.
What are sliders
Sliders are small individual sandwiches usually made on soft, mini rolls. They are packed with fillings like meat, cheese, and sauces.
The name "Slider" originally came from the small burgers served at White Castle. It is said that they were greasy and easy to "slide" down quickly.
Equipment
- Flint and Flame Knives - A great knife is always needed, and I love my Flint and Flame knives.
- Staub Baking Dish - Beautiful and functional.
- Olive Oil Sprayer - This is my favorite kitchen tool; it makes spraying your pans so much easier and healthier than buying canned sprays.
- Skillet - This is a perfect skillet for sauteeing your onions.
Ingredients
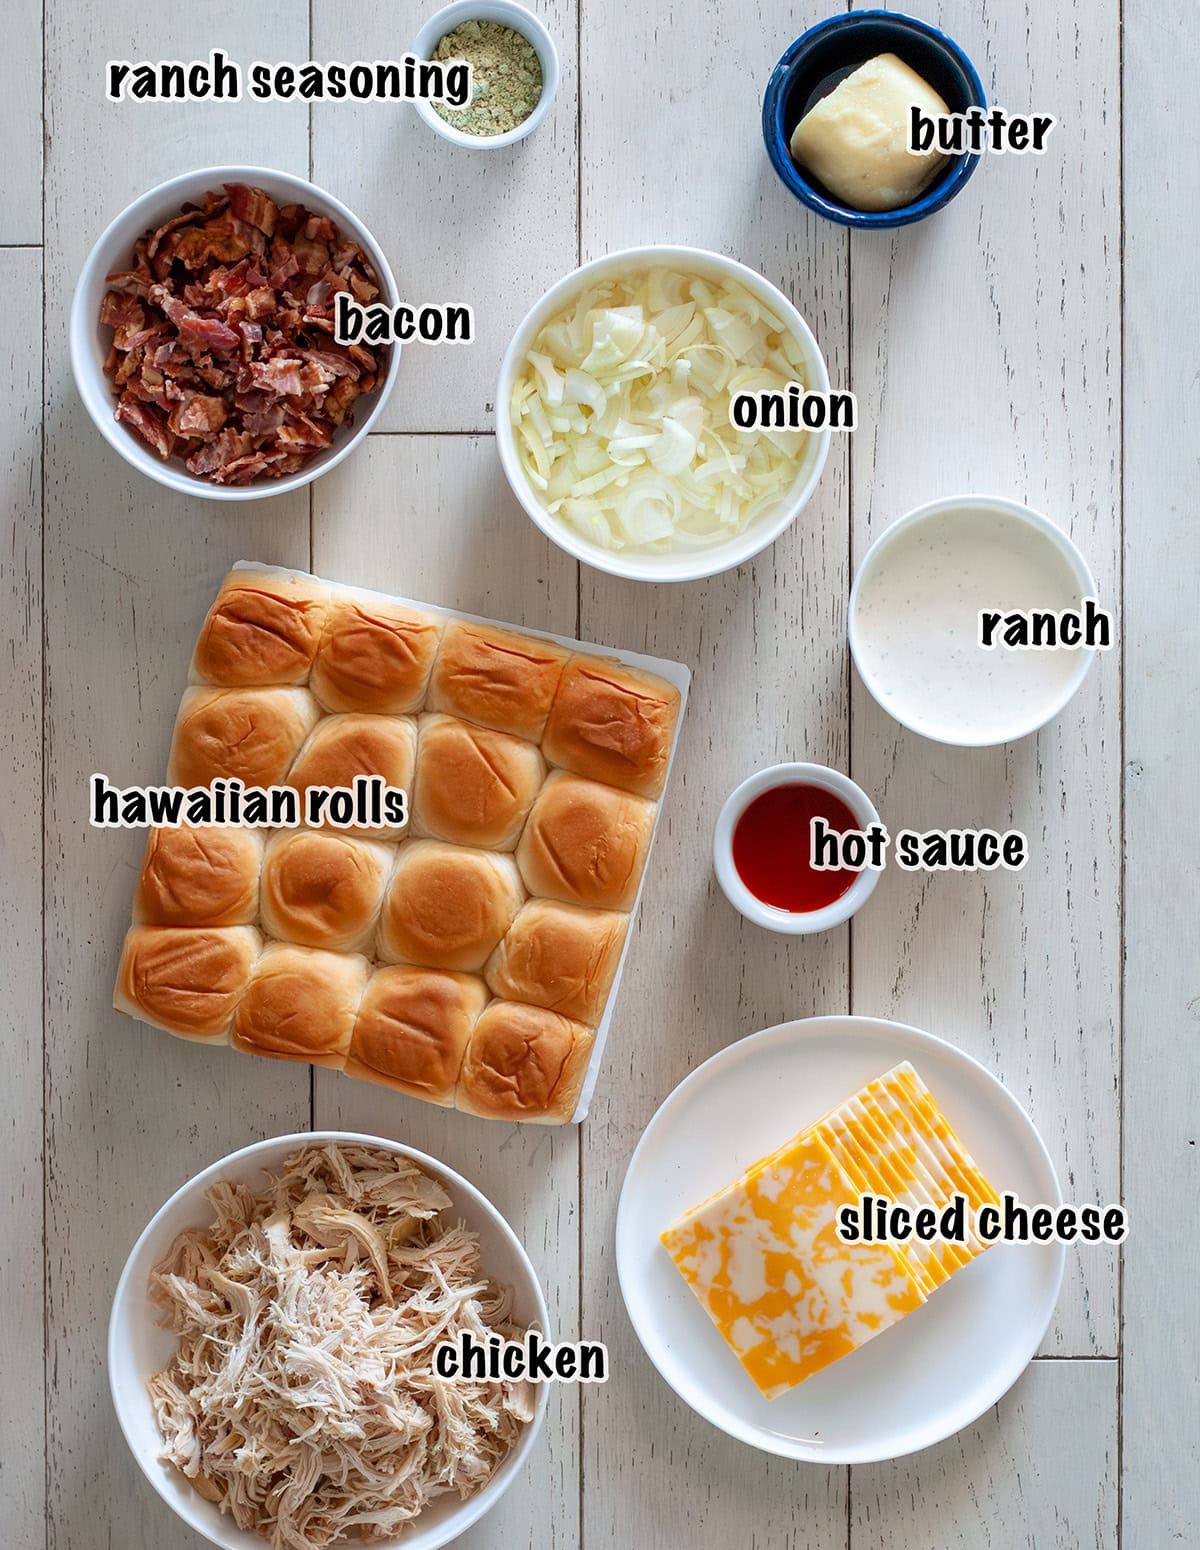
- Hawaiian Rolls: The sweet bread to make these slides pop!
- Shredded Chicken: I used my Crock-Pot Shredded Chicken for this recipe.
- Sliced Colby Jack Cheese: A perfect mild, melting cheese.
- Bacon: Salty, smoky, and delicious.
- Onion: A sweet layer of flavor, I used a sweet white onion.
- Butter: For the topping.
- Ranch Seasoning: An easy flavor boost!
- Ranch: Choose a good one for the best flavor. I made my Buttermilk Ranch.
- Hot Sauce: This is optional, but I love the little kick it adds.
Tim's Tip: Make your own bacon bits for the best flavor - I baked my bacon in the oven at 375°F for 15-20 minutes for the perfect crunch.
Recipe Video
How to make Chicken Bacon Ranch Sliders
- Prep Onions: Dice the onions and sauté them in a small amount of oil on medium heat until soft. Set aside.
2. Preheat the Oven: Preheat your oven to 325°F.
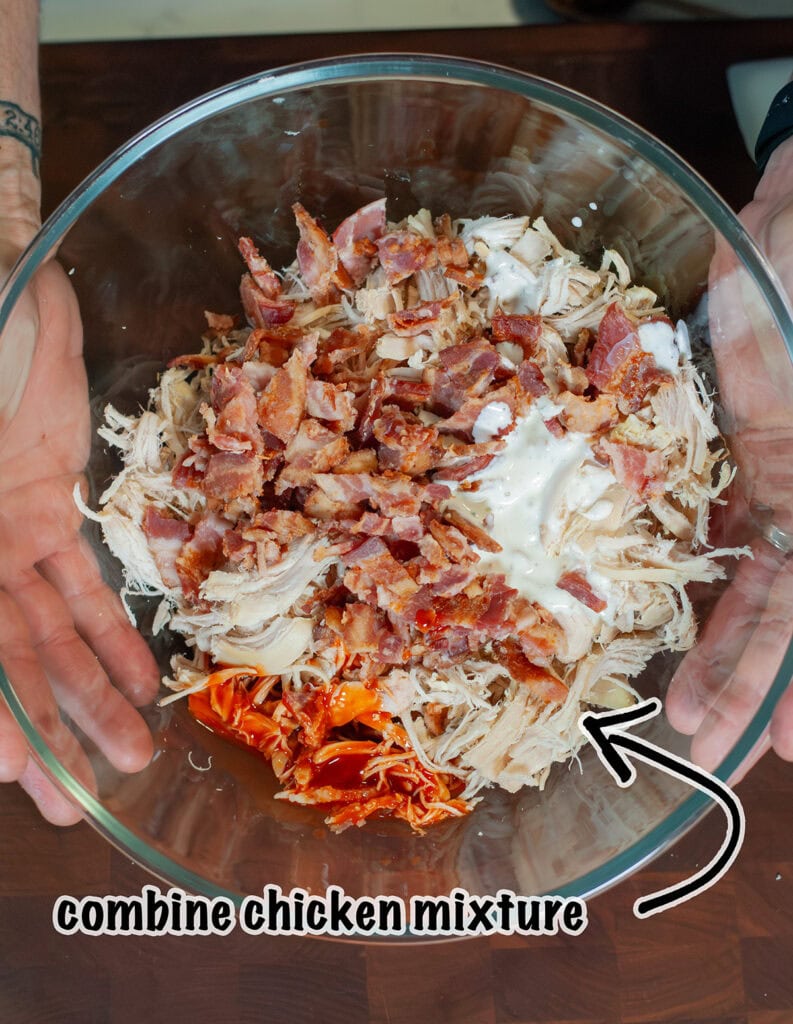
3. Make the Chicken Mixture: In a large bowl, combine shredded chicken, ¾ of the cooked bacon, and half the ranch dressing. Mix until well combined, and you want the mixture to be a little bit moist but not overly wet.
4. Prepare the Rolls: Slice the rolls in half to create a bottom and top layer. Lightly spray a baking dish with oil and place the bottom half of the rolls in the pan.
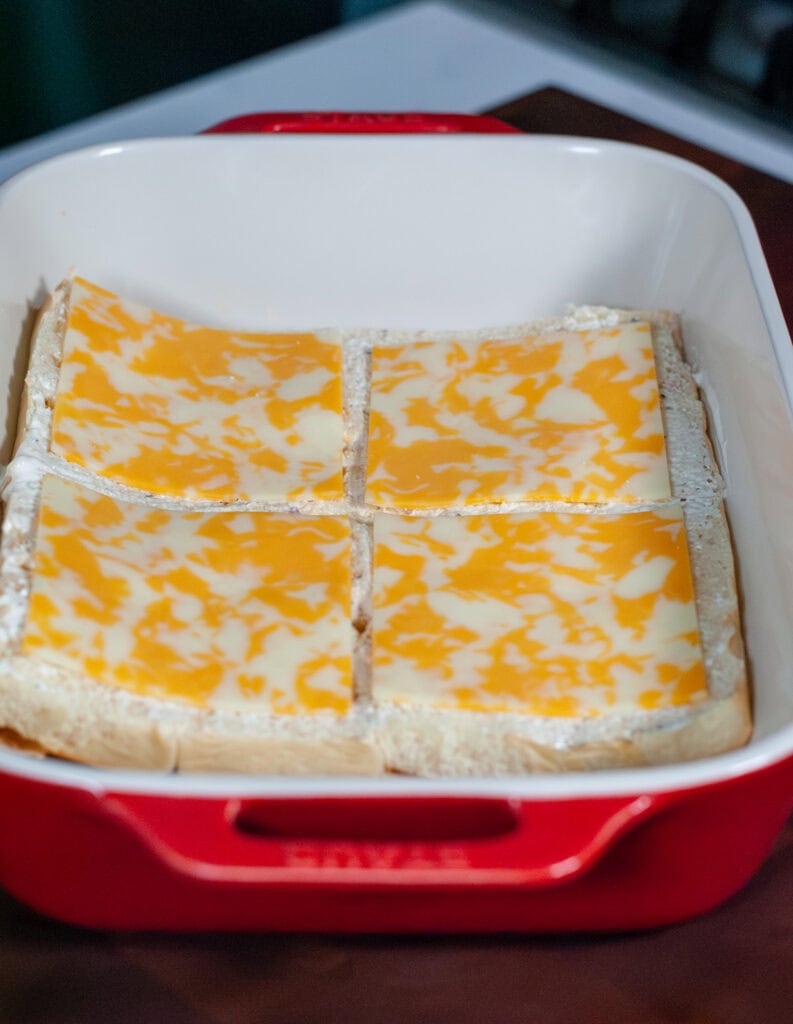
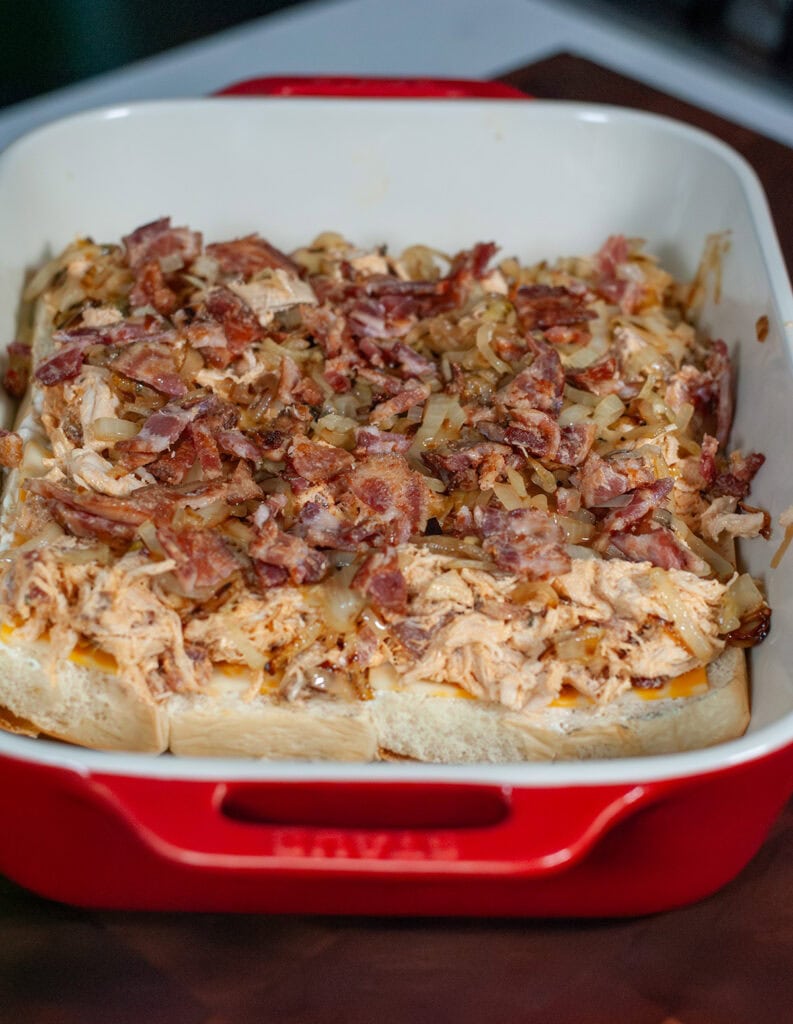
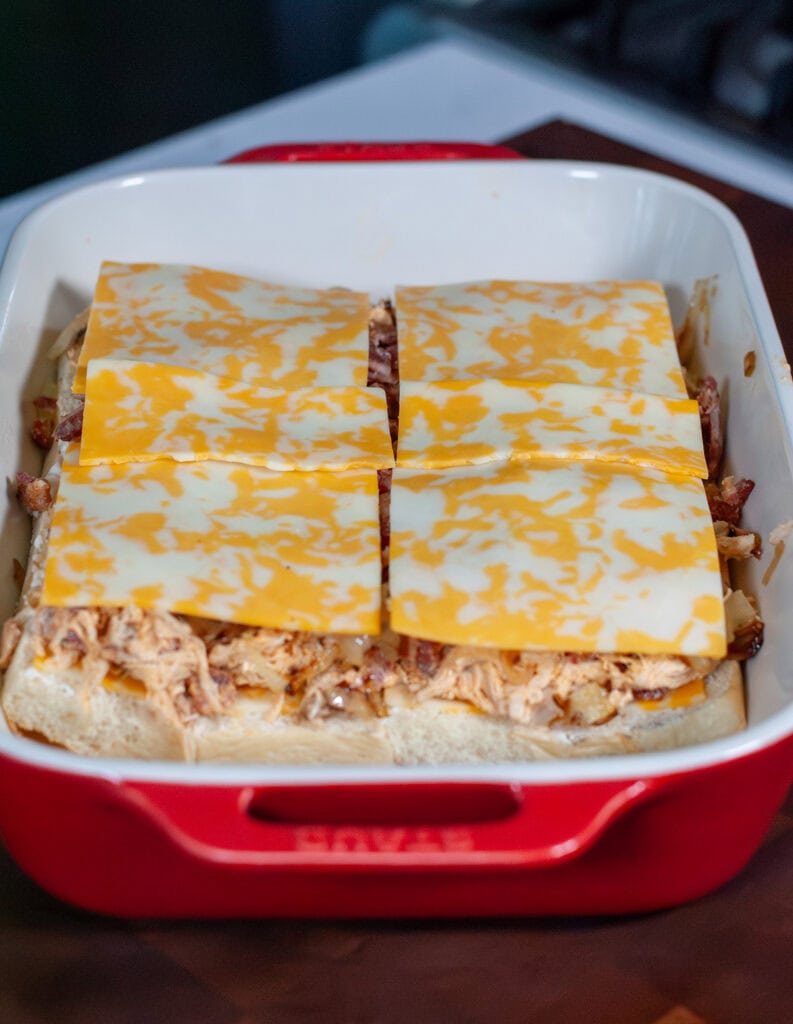
5. Assemble the Sliders: Brush ranch on the bottom rolls. Layer with half the cheese, chicken mixture, sautéed onion, and bacon...then repeat with the second half. Spread ranch on the inside of the top layer of rolls and then place on top.
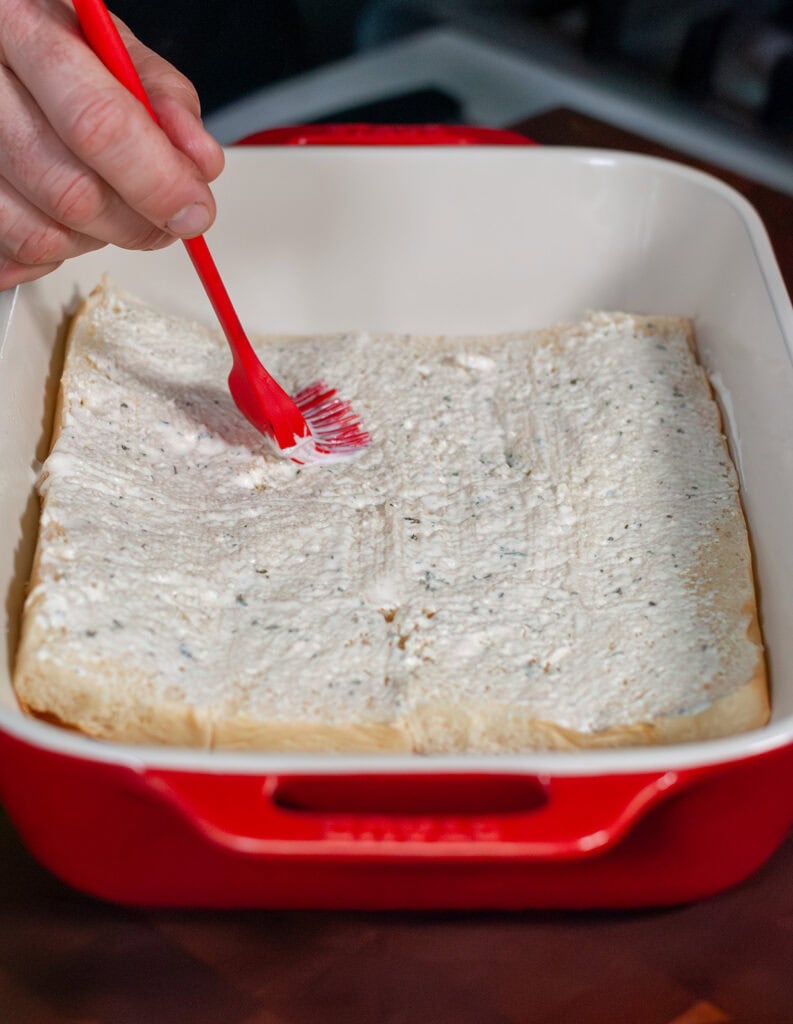
5. Add the Topping: Melt butter and mix it with the ranch seasoning. Using a pastry brush, evenly spread it on top of the rolls.
6. Bake: Cover with foil and bake for 20 minutes, then uncover and bake an additional 10 minutes, or until the tops are golden and the cheese is melted.


Substitutions and Variations
- Chicken Swap
- Shredded turkey breast
- sliced chicken from the deli
- Canned chicken
- Bread Swap
- Hoagie Rolls
- Potato Buns
- Pretzel Buns
- Ranch Swap
- Caesar dressing
- Blue Cheese dressing
- Cheese swap
- Pepper Jack Cheese
- Monterey Jack Cheese
- Cheddar Cheese

Tims Tips
- Make your own bacon bits for the best flavor - I baked my bacon in the oven at 375°F for 15-20 minutes for the perfect crunch.
- For the best texture, don't overdo the ranch in the chicken mixture. You want it to be creamy and not soggy.
- Easy cleanup - Use parchment paper to prevent sticking, and it also helps with transferring the sliders.
- Choose Good Ranch Dressing - The dressing you choose brings so much flavor. Choose your favorite, or even better, try my homemade Buttermilk Ranch.
What to Serve with Chicken Sliders
Storage
Refrigerator - Once sliders are cooled, place them in an airtight container and refrigerate for up to 3 days.
Freezer - Wrap tightly in plastic and foil. Freeze for up to 3 months. Thaw overnight in the fridge, then bake as directed.
Reheating: The best way to reheat chicken bacon ranch sliders is in the oven at 325°F for 10-15 minutes, covered in foil. A microwave will work for a quick fix, but the buns could be slightly rubbery.
FAQs
Colby Jack is a great choice because it is creamy, mild, and melts beautifully. Sharp cheddar adds a bolder flavor, while mozzarella will give you a gooey cheese pull. I say, use your favorite, because any melty cheese will work great.
Yes, you can use chicken thighs if you prefer. That will make an even more juicy and flavorful sandwich.
Yes, this is a great freezer friendly meal. Make as directed, cool completly, slice into individual sliders and wrap in foil. Place in a ziplock storage back and freeze for up to 3 months.
More Delicious Sliders
- Roast Beef Sliders
- Corned Beef Sliders
- Birria Taco Sliders
- Crispy Chipotle Chicken Ranch Sliders
- Bacon and Blue Cheese Sliders
What are the "must-haves" on your family menus? Let me know your family's favorite recipes in the comments! I love gathering ideas from fellow cooks!
Made this recipe? Let me know!
Recipe

Chicken Bacon Ranch Sliders
Equipment
- 1 Knife
- 1 Skillet
Ingredients
- 1 Package Hawaiian Slider Buns
- 1 cup Onion Diced
- 12 oz Shredded Chicken
- 9 Slices Colby Jack
- 10 slices Cooked Bacon (1 ½ cups bacon bits)
- 1 cup Ranch Dressing
- ¼ cup Hot Sauce
- 1 tablespoon Ranch Seasoning
- 3 tablespoon Butter Melted
Instructions
- Prep Onions: Dice the onions and Sauté them in a small amount of oil on medium heat until soft. Set aside.
- Preheat the Oven: Preheat your oven to 325°F
- Make the Chicken Mixture: In a large bowl, combine shredded chicken, ¾ of the cooked bacon, and half the ranch dressing. Mix until well combined, and you want the mixture to be a little bit moist but not overly wet.
- Prepare the Rolls: Slice the rolls in half to create a bottom and top layer. Lightly spray a baking dish with oil and place the bottom half of the rolls in the pan.
- Assemble the Sliders: Brush ranch on the bottom rolls. Layer with half the cheese, chicken mixture, sautéed onion, and bacon...then repeat with the second half. Spread ranch on the inside of the top layer of rolls and then place on top.
- Add the Topping: Melt butter and mix it with the ranch seasoning. Using a pastry brush, evenly spread it on top of the rolls.
- Bake: Cover with foil and bake for 20 minutes, then uncover and bake an additional 10 minutes, or until the tops are golden and the cheese is melted.
Video
Notes
- Make your own bacon bits for the best flavor - I baked my bacon in the oven at 375°F for 15-20 minutes for the perfect crunch.
- For the best texture, don't overdo the ranch in the chicken mixture. You want it to be creamy and not soggy.
- Easy cleanup - Use parchment paper to prevent sticking, and it also helps with transferring the sliders.
- Choose Good Ranch Dressing - The dressing you choose adds a lot of flavor. Choose your favorite, or even better, try my homemade Buttermilk Ranch.
Nutrition

The Family Table Cookbook is Available Now!
It's finally here! Experience over 40 family-approved recipes that are easy to follow and easy to eat.
Tim specializes in easy family dinner recipes, home cooked meals and comfort food recipes everyone will love. We love to make simple, delicious recipes that make getting dinner on the table easy!
*This post may contain affiliate link(s), so we may earn a small commission when you make a purchase through links on our site at no additional cost to you. Thank you for your support and understanding.


Comments
No Comments