
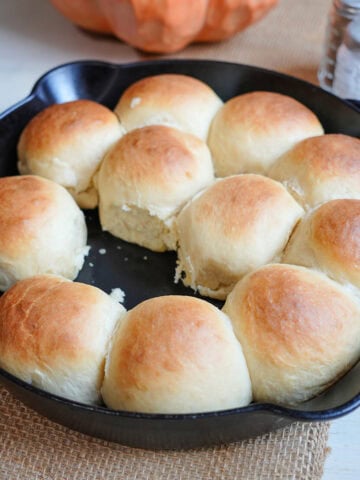
Bring the comfort of homemade bread to your table with these Sourdough Dinner Rolls. They are easy to make and a delicious addition to everything from weeknight dinners to your holiday feast.

These Sourdough Dinner Rolls are soft, fluffy, buttery, and slightly sweet, making them the perfect homemade rolls for any occasion. Made with active sourdough starter and a little yeast for extra lift, they are easy to shape and bake up beautifully golden brown.
I wanted to create a sourdough dinner roll recipe that delivered that wonderful homemade sourdough flavor with the soft, fluffy texture everyone loves. Using a little yeast helps the rolls rise more quickly and consistently, so you can enjoy delicious homemade bread without as much guesswork. These are tried-and-true and, in my opinion, about as close to perfection as you can get!
If you love homemade bread and comforting family favorites, be sure to try my Cheesy Cornbread!
Why you will love this Recipe
- Soft and Fluffy: This dinner roll recipe makes the fluffiest and softest sourdough rolls.
- Subtle Sourdough Flavor: The active sourdough starter adds a delicious depth of flavor without making these rolls overly tangy! The touch of sweetness makes them even better.
- Easy to Shape: Don't let homemade sourdough intimidate you! These rolls are easy to shape into smooth dough balls, making this a great recipe for home bakers.
- A Family Favorite: These are my go-to soft sourdough rolls, perfect for any family dinner.
Reader Review: "These rolls worked great for using my sourdough starter. I am not a professional baker, yet these turned out perfectly! " - Dorese

Helpful Equipment
- Sourdough Starter Jar - This jar has measurements on the side, which makes it easy to track how much your starter grows.
- Baking Dishes - I love these Staub baking dishes. They clean well, and having a set of 3 different sizes has proven to be so helpful in my kitchen!
- Mixing Bowls - Priority Chef mixing bowls have a non-slip bottom that I LOVE! Less mess is always best, right?
- Measuring Cups - Having a set of different sizes is lifesaving in the kitchen! This Anchor brand is my go-to
- Kitchen Scale: You don't need an expensive scale to bake great bread. Weighing the dough makes it so much easier to portion evenly sized dinner rolls.
- Basting Brush: My favorite brand because it's easy to clean and gets the job done!
Ingredients
- Water: Warm water helps bring the dough together and activates the yeast. Aim for 90°F.
- Whole Milk: Adds moisture and helps create soft, tender dinner rolls. You can substitute cream for a richer roll.
- Yeast: A little yeast gives these sourdough rolls extra lift and helps make the rising time more predictable.
- Sea Salt: Enhances the flavor of the dough.
- Active Sourdough Starter: Use a recently fed, bubbly starter that is active and ready to bake with.
- Sugar: Adds a touch of sweetness and helps round out the flavor.
- Salted Butter: Adds richness and flavor to the dough.
- Unbleached Bread Flour: Provides the structure needed for soft, fluffy rolls that hold their shape.
- Butter: For buttering the pan to prevent sticking, while brushing the tops gives the finished rolls a delicious buttery finish.
Tim's Tip: Make sure your sourdough starter is active before you begin. Keep in mind the starter activity depends on the temperature of your kitchen and how recently it was fed.
How to Make Sourdough Dinner Rolls
Making the Dough
1. Gather and measure all your ingredients before you begin. Having everything ready makes the process easier and helps you keep track of each step.
2. Warm the water and whole milk to approximately 90°F. You want it warm, not hot, so you don't damage the yeast.

3. In a large mixing bowl, combine the water, milk, yeast, salt, active sourdough starter, sugar, and salted butter. Mix well until the starter is mostly dissolved and everything is evenly combined.

4. Add in the unbleached bread flour and mix until a rough dough begins to form. Lightly wet your hands and work the dough together into a cohesive ball. Knead the dough in the bowl for 3-4 minutes, until it begins to feel smoother and more elastic.
Rest, Stretch and Folds
5. Cover the bowl and let the dough rest at room temperature for 30 minutes. This rest gives the flour time to absorb the liquid and makes the dough easier to handle.

6. Perform a series of stretch-and-folds to help strengthen the dough. With slightly damp hands, lift one side of the dough, stretch it gently, and fold it over the center. Turn the bowl and repeat until you have worked around the dough.
Complete four sets of stretch-and-folds, spacing each set about 30 minutes apart.

Proofing and Shaping the Rolls
7. After the final stretch-and-fold, allow the dough to continue resting for approximately 2½ hours, or until it has increased in volume by about 75%. Rising time can vary depending on the temperature of your kitchen and the activity of your starter.
Using a kitchen scale, divide the dough into 80-gram portions for evenly sized rolls.
Working with one portion at a time, gently flatten the dough, fold the edges toward the center, and continue working around the dough until a smooth ball forms. Pinch the bottom seam closed to help the roll hold its shape.

Baking Dinner Rolls
8. Grease a 9 x 11 baking dish with 1 ½ tablespoon softened butter, coating the bottom and sides.
Arrange the shaped dough balls into three rows of four. Cover the dish with plastic wrap and let the rolls rise until they have doubled in size. The final rise takes me around 3 hours during the winter months, but remember your timing may vary depending on your kitchen temperature.

9. Preheat your oven to 375°F. Once the rolls have finished their final rise, bake uncovered for 28-30 minutes until golden brown on top.
10. As soon as the rolls come out of the oven, brush the tops generously with melted butter. For a special finishing touch, lightly sprinkle a little sugar over the tops.
Substitutions and Variations
- Whole milk or cream. Whole milk gives these dinner rolls a soft, tender texture. You can substitute cream for a richer roll, though the dough might have a slightly different texture.
- Salted or Unsalted Butter. I use salted butter for extra flavor. If you prefer unsalted butter, you can use it instead without changing the recipe.
- A Sweeter Finish. I love brushing the warm rolls with melted butter and adding a light sprinkle of sugar. For a more savory finish, skip the sugar and enjoy that buttery goodness on its own.
Expert TIp
- Warm your liquids ot 90°F. I use warm water and whole milk to help get the dough off to a good start!
- Keep your dough warm in cooler weather. When I am making sourdough rolls during the winter, I warm my mixing bowl with warm water before adding the ingredients. This helps prevent the bowl from cooling the liquids and dough too quickly.
- Don't overwork the dough. Knead for about 2 minutes in a stand mixer or 3-4 minutes by hand. The dough should become smooth and elastic. To test it, gently stretch a small piece between your fingers. If you can stretch it thin enough to see light through it without tearing!
- Don't skip the brush of melted butter - it gives the rolls a beautiful shine and adds another layer of buttery flavor.
What to serve with Dinner Rolls
These Sourdough Dinner Rolls are the perfect addition to just about any meal! They are the perfect addition to just about any meal!
- Slow Cooker Chicken Noodle Soup
- Shepherd's Pie
- Salad with Buttermilk Ranch
- They go perfectly with your Holiday feast! These rolls belong on your holiday table!!
Storage
- Room Temperature: Allow your Dinner Rolls to cool completely, then store them in an airtight container or resealable bag at room temperature for up to 3 days. Keep them away from direct sunlight and heat to help maintain their soft texture.
- Reheating: To bring back that fresh-from-the-oven taste, warm the rolls in a 300°F oven for about 5-10 minutes. You can also microwave an individual roll for 10-15 seconds.
- Freezing: These dinner rolls freeze well! Once completely cooled, place them in a freezer-safe bag or airtight container and freeze for up to 3 months. Thaw at room temperature and warm in the oven before serving.
Faq
I wanted these Sourdough Dinner Rolls to be extra soft and fluffy! The active sourdough starter adds that wonderful sourdough flavor, while a little commercial yeast helps the dough rise more quickly and consistently. It is a great way to get the best of both worlds.
Traditional sourdough bread uses a live sourdough starter made from flour and water, which contains naturally occurring wild yeast and bacteria. These microorganisms cause the dough to ferment, which creates sourdough's distinctive flavor and texture.
Yes, you can mix the dough and refrigerate it after the first rise. Cover it tightly and place it in the refrigerator until you are ready to continue. When you are ready to make the rolls, allow extra time for the dough to warm up, shape the rolls, and complete their final rise before baking.
Recipe

Homemade Sourdough Dinner Rolls

Equipment
- Oven
Ingredients
- 200 g Water Warmed to 90°
- 125 g Whole Milk or Cream Warmed to 90°
- ⅓ teaspoon Yeast
- 12 g Sea Salt
- 125 g Sourdough Active Starter
- 44 g Sugar plus ½ teaspoon for topping
- 24 g Butter salted
- 525 g Unbleached Bread Flour
- 3 tablespoon Butter for coating dish and topping rolls
Instructions
- Gather and measure all your ingredients before you begin. Having everything ready makes the process easier and helps you keep track of each step.
- Warm the water and whole milk to approximately 90°F. You want it warm, not hot, so you don't damage the yeast.
- In a large mixing bowl, combine the water, milk, yeast, salt, active sourdough starter, sugar, and salted butter. Mix well until the starter is mostly dissolved and everything is evenly combined. 200 g Water 125 g Whole Milk or Cream ⅓ Tsp Yeast 12 g Sea Salt 125 g Sourdough Active Starter 44 g Sugar 24 g Butter
- Add in the unbleached bread flour and mix until a rough dough begins to form. Lightly wet your hands and work the dough together into a cohesive ball. Knead the dough in the bowl for 3-4 minutes, until it begins to feel smoother and more elastic. 525 g Unbleached Bread Flour
- Cover the bowl and let the dough rest at room temperature for 30 minutes. This rest gives the flour time to absorb the liquid and makes the dough easier to handle.
- Perform a series of stretch-and-folds to help strengthen the dough. With slightly damp hands, lift one side of the dough, stretch it gently, and fold it over the center. Turn the bowl and repeat until you have worked around the dough. Complete four sets of stretch-and-folds, spacing each set about 30 minutes apart.
- After the final stretch-and-fold, allow the dough to continue resting for approximately 2½ hours, or until it has increased in volume by about 75%. Rising time can vary depending on the temperature of your kitchen and the activity of your starter. Using a kitchen scale, divide the dough into 80-gram portions for evenly sized rolls. Working with one portion at a time, gently flatten the dough, fold the edges toward the center, and continue working around the dough until a smooth ball forms. Pinch the bottom seam closed to help the roll hold its shape.
- Grease a 9 x 11 baking dish with 1 ½ tablespoon softened butter, coating the bottom and sides. Arrange the shaped dough balls into three rows of four. Cover the dish with plastic wrap and let the rolls rise until they have doubled in size. The final rise takes me around 3 hours during the winter months, but remember your timing may vary depending on your kitchen temperature.
- Preheat your oven to 375°F. Once the rolls have finished their final rise, bake uncovered for 28-30 minutes, until golden brown on top.
- As soon as the rolls come out of the oven, brush the tops generously with melted butter. For a special finishing touch, lightly sprinkle a little sugar over the tops. 3 Tbsp Butter
Notes
- Warm your liquids ot 90°F. I use warm water and whole milk to help get the dough off to a good start!
- Keep your dough warm in cooler weather. When I am making sourdough rolls during the winter, I warm my mixing bowl with warm water before adding the ingredients. This helps prevent the bowl from cooling the liquids and dough too quickly.
- Don't overwork the dough. Knead for about 2 minutes in a stand mixer or 3-4 minutes by hand. The dough should become smooth and elastic. To test it, gently stretch a small piece between your fingers. If you can stretch it thin enough to see light through it without tearing!
- Don't skip the brush of melted butter - it gives the rolls a beautiful shine and adds another layer of buttery flavor.
Storage
- Room Temperature: Allow your Dinner Rolls to cool completely, then store them in an airtight container or resealable bag at room temperature for up to 3 days. Keep them away from direct sunlight and heat to help maintain their soft texture.
- Reheating: To bring back that fresh-from-the-oven taste, warm the rolls in a 300°F oven for about 5-10 minutes. You can also microwave an individual roll for 10-15 seconds.
- Freezing: These dinner rolls freeze well! Once completely cooled, place them in a freezer-safe bag or airtight container and freeze for up to 3 months. Thaw at room temperature and warm in the oven before serving.
Nutrition
*This post may contain affiliate link(s), so we may earn a small commission when you make a purchase through links on our site at no additional cost to you. Thank you for your support and understanding.


Comments
No Comments